
Before Getting Started….
What it is!!!!!
Thanks for checking out the Soundhole Sessions, I’ve spent a lot of time putting together something that I hope will make sense to anyone, whether beginner or novice, perhaps even the virtuoso or two that may stumble upon this. I hope it’s worth your while. And if it isn’t, we, unfortunately, don’t have a cash back policy. But you didn’t pay anything anyways so…….
Yeah. Let’s get down to business.

I’ve noticed these days that everyone seems to know everything about guitars. Just try googling ‘how to play guitar,’ and see how many results you get. There is a litany of tutorial videos, books and other information that promises to be your last stop in the search for self-help learning. So what makes The Soundhole Sessions any different from those ones? I honestly don’t know, because I never went through them all. Didn’t have the time. But what I did do, is teach myself how to play the guitar, and all I hope is that sharing what I know will help one or two (and maybe a whole lot more) people out there who may not have an instructor but still want to learn. This is for you.
Okay, so while I never really went through all the guitar material online, when I dipped in to see if there was any learning I was missing out on, I found that a lot of this stuff, although meant to be easily understood, ended up being pretty confusing. I would start going somewhere, only to be thrown off by deep ‘musical’ terms that were introduced perhaps too early. Although I managed to get around it, I had to unlearn a lot of things that were taught the wrong way so I could learn them the right way.
I don’t consider myself to have done it yet in the field of music but on my trip there, I’m taking as many as I can with me by learning from the mistakes I’ve noticed other instructors are making, filling the gaps and then teaching the stuff that I know in the simple way I understood them.
Right Before getting Started: The Guitar

Because you can’t play guitar without one, right? Right? No?…….Tough crowd……
So….ummm yeah. Getting familiar with your guitar won’t take any time at all. Start by giving her a name, if you haven’t already. She is your best friend from now on, and you need to treat her as such. I call my Francesca Amanda Palmer; it’s a ridiculously awesome name, but no pressure.
Going on to the parts, some of the common words you should know are frets, the neck, the bridge, and it doesn’t take a brain surgeon to figure out which the other parts such as pegs and the soundhole are.
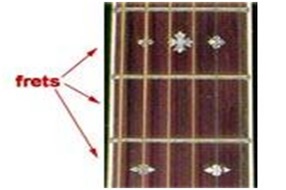
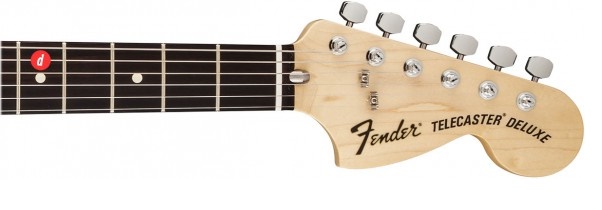
Look at your guitar neck. This one doesn’t look like yours? My apologies. But you still get the picture, right? You’ll notice there are metal strips running across its entire surface. These pieces of metal are referred to as “frets.” Note that the word “fret” can be used to describe the piece of metal itself or the space on the neck between one piece of metal and the next.

The ‘first’ fret is the space between the number 1 and 0, the second fret is the space between the number 2 and 1, the third between the number 3 and 2, and so on.
Right Right Before Getting Started: Tuning Your Guitar
My friend Mwitwa just reminded me (sarcastically) that there is a high possibility that someone who just picked up a guitar may or may not be able to tune it by ear, so lessons that promise to help people learn how to play by themselves should probably include something about tuning guitars. Right. In case you’re not planning on downloading an app on your phone to help, let me just run through that really fast.
Standard Guitar Tuning: EADgbe
When looking straight down at your guitar the open strings from the thickest to the thinnest are as follows:

Even though you are basically using the guitar to tune itself with this method, you will still need a reference to get at least one of the strings in tune. A guitar tuning app will come in handy, but if you have a standard tuning fork, you can use that too by making it vibrate, the tweaking you A string until you’re sure they are ringing at the same frequency (basically, until they sound the same.) You will need to employ that keen ear for hearing for harmony to tune the rest of the strings.
Step 2: The 5th String – A

Place your index finger on the fifth fret of the bottom E string. That’s an A note. Keep your finger on that fret. Now pick the open fifth string and fretted six string in turn, gently adjusting the fifth string tuning peg until the two notes are in harmony. Tightening the peg will make the pitch higher, loosening the peg will make the pitch lower.
Step 3: The 4th String – D
Place your index finger on the fifth fret of the A string. That’s a D note. Pluck the fretted 5th string and the open 4th string together or alternating between them and adjust the 4th string tuning peg until the pitch of the 4th string matches the pitch of the 5th fret of the 5th string.
Step 4: The 3rd String – G

Place your index finger on the fifth fret of the D string. That’s a G note. Pluck or alternate pick the fretted 4th and open 3rd strings, adjusting the 3rd string tuning peg until the 3rd string is in harmony with the 5th fret of the 4th string.
Step 5: The 2nd String – B

Place your index finger on the fourth fret of the G string. That’s a B. Tune your 2nd string to that note.
Tip: How to Remember Standard Tuning Pattern
The B string is the only string that gets its reference tone from the 4th fret of the string above it. All the rest of the open strings utilize the 5th fret of the string above as a reference tone. If you can remember this tuning pattern you will always be able to tune your guitar.
Step 6: Tuning the E String

Place your index finger just behind the fifth fret on the B string. That’s an E note. Tune the thinnest and last string to that, again by adjusting the 1st string tuning peg until the pitch of the E string matches the 5th fret of the 2nd String.
Getting Started (Finally!): Learning the Chords
Because you can’t play without them, right? Right? Okay, it’s getting old; let me just stop.
While there is a lot of theory that goes on behind the scenes, concerning chord construction, for example, it may be beneficial to learn the chords first then see the working behind them once you have familiarized yourself with the basic ones.
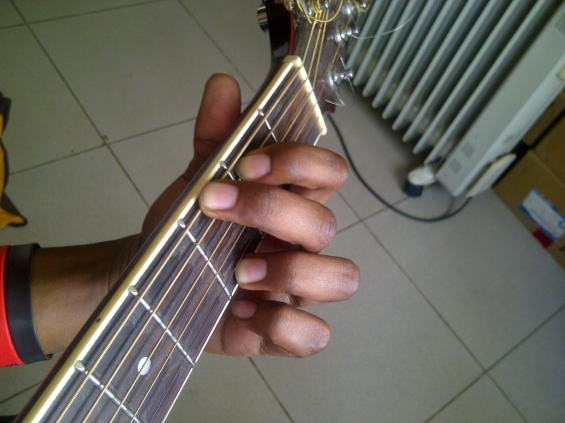
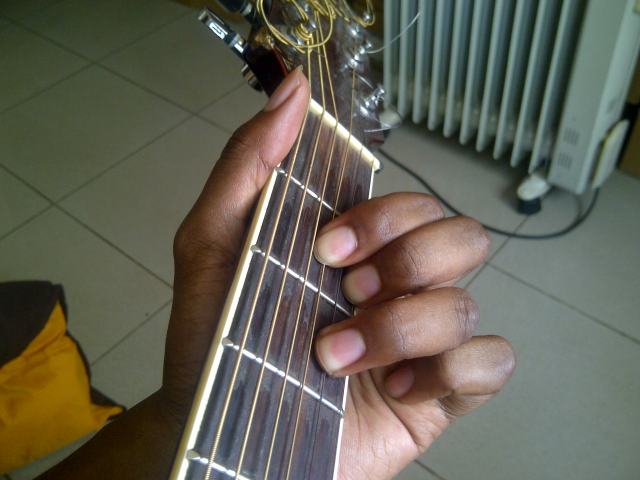
 This hand doesn’t look like yours? It’s cool; we’re all family in the end. And no, I’m not married. (My hand doesn’t look like this one either). Buffoonery aside, remember the numbers, because they will tell you the finger to place on the string in the chord diagrams.
[Just a side note, some people say never play chords with your thumb at all, but I say whose guitar is it for? Whose thumb is it? Is anyone dying because you’re using your thumb? Didn’t think so. If it doesn’t make switching between chords harder, do you, boo boo. Do you]
The Chords
G major chord
 Take your second finger, and put it on the third fret of the sixth string. Next, take your first finger, and put it on the second fret of the fifth string. Lastly, put your third finger on the third fret of the first string. Make sure all of your fingers are not touching any strings they’re not supposed to as this will prevent the strings from sounding properly. Try to keep them curled and have the tips touching the fretboard perpendicularly.
Now play each string (starting with the sixth) one at a time, listening to be sure each note rings out clearly. If not, examine your hand to determine why it doesn’t. Remember to press the strings down as hard as you can. Do this for every chord.
C major chord
 Place your third finger on the third fret of the fifth string. Now, put your second finger on the second fret of the fourth string. Finally, put your first finger on the first fret of the second string. Take extra attention to make sure you don’t strum the sixth string. If you are using a pick, watch your pick to make sure you only strum the bottom five strings when you are first learning the C major chord. Test this chord as you did with the G major chord, to make sure all notes are ringing clearly.

D major chord
 This should be one of the easier chords to play once you get used to having your fingers fit in a smaller space. Place your first finger on the second fret of the third string. Then, put your third finger on the third fret of the second string. Lastly, place your second finger on the second fret of the first string. Strum only the bottom 4 strings when playing a D major chord.
These are three of the 7 major chords you will be using quite a lot to play songs, as many of them are based in these keys. Take some time to familiarize yourself with them before moving on to the others.

Realistically, to improve on your guitar, you’re going to need to set aside a bit of time to practice. Developing a daily routine is a good idea. Planning to spend at least 15 minutes daily practicing all you’ve learned will really help. Here are some tips to help. And like everything else, you can pick what you want and throw away the rest:
- Get your guitar in tune.
- Make sure you’re sitting, holding the guitar, and using your pick properly. You’ll have to correct your natural bad habits at first until it becomes second nature.
- Keeping short nails goes a long way so make sure you have a nail clipper handy.
- Play each of the chords you’ve learned. Check to be sure each note is ringing. If not, find out why, and correct the problem.
- Try moving from one chord to another. Before switching chords, mentally picture exactly where each finger is going to move in order to play the next chord. Only then should you switch chords. This is the key to switching chords quickly.
- Try to always place your fingers in the middle of the fret when playing to improve the sound of the notes
- Allow yourself to get frustrated. It is normal to feel like you aren’t doing something right or aren’t learning fast enough. It will fuel you to do more.
- During the first three days, and for the next one or two weeks, it can get pretty sore on the fingers. Pretty is actually an understatement. If you push too hard (as I did) you may feel a tear piercing through your eyes every now and then. I found that placing my fingers on ice helped numb the pain, and allowed me to keep practicing when I didn’t want to stop just yet.

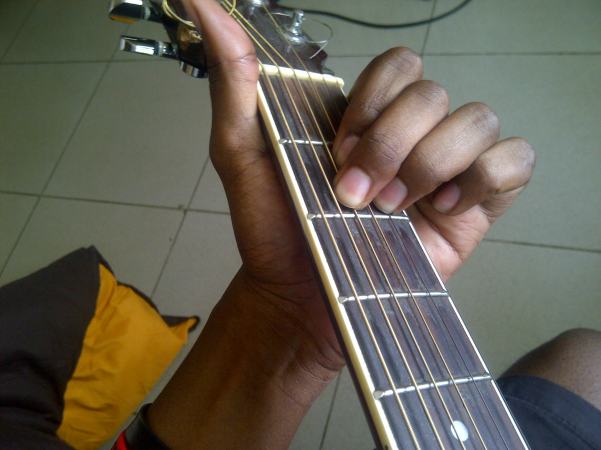
An idea of how your fingers should meet the fretboard when you’re playing a chord, as perpendicularly as you can get them to be.
Once you’re done, you can try out the rest of the major chords.
A Major
 One of the easier chords to play. Don’t forget what you learned about sounding the strings correctly and making sure your fingers aren’t touching the strings that they aren’t supposed to.
B Major
 This is definitely one of the harder chords to play and can be quite frustrating at first. I got by avoiding it completely! But once you’re done running, you can tackle it. The magic word is practice.

F major
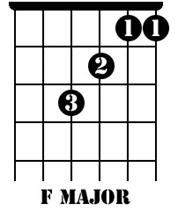 A rather challenging chord to play, as it leaves your fingers kinda stretched out like gymnastics. It needs quite a bit of practice to get right. Lots of effort needs to be put in pressing the first and second strings at the same time, while still playing the third and fourth strings. It may be challenging at first but it really does get easy with time.

E Major
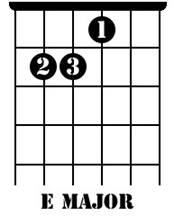 A solid sounding chord; relatively easy to play too. There are a number of different ways of playing it, and you can see them in the chord gallery.

These are your basic major chords. I cannot stress enough how important practice is. You won’t become Jimi Hendrix overnight but getting to know the chords and playing them without having to look at chord charts is your first step there. Practice knowing the chords, but also switching the chords using simple rhythms. In the next parts, we will get to learning more chords, known as minor chords and also introduce a little bit of music theory.
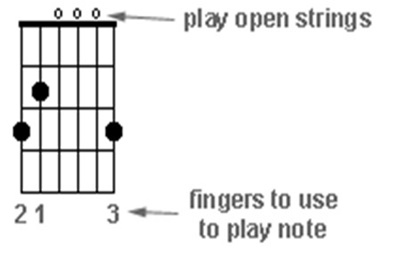
[One more side note, in case it wasn’t clear, and ‘x’ on the diagrams means you shouldn’t play the string that has an ‘x,’ and an ‘o’ means play it, but don’t put any fingers on it. It’s an open string. Remember, it’s ‘o’ for open.]
Feedback is always welcomed so don’t hesitate to contact if you run into any problems.
Joining you for the second session soon.
Bless!!!!!
~J~


Great!!! Always inspiring me to pick up my guitar again! 🙂
LikeLiked by 1 person
You should, Ced, especially you hehe
LikeLike